마크다운은 일반 텍스트 기반의 경량 마크업 언어다. 일반 텍스트로 서식이 있는 문서를 작성하는 데 사용되며, 일반 마크업 언어에 비해 문법이 쉽고 간단한 것이 특징이다. HTML과 리치 텍스트(RTF) 등 서식 문서로 쉽게 변환되기 때문에 응용 소프트웨어와 함께 배포되는 README 파일이나 온라인 게시물 등에 많이 사용된다. 위키백과
Angular에서 ngx-markdown-editor 패키지를 사용하여 Markdown Editor 기능을 구현하는 방법에 대해 알아보겠습니다.
ngx-markdown-editor와 ace-builds, bootstrap, font-awesome 패키지도 필수로 설치합니다.
1
2
$ npm install ngx-markdown-editor --save $ npm install ace-builds bootstrap font-awesome --save
angular.json 파일에서 다음 내용을 추가합니다.
1
2
3
4
5
6
7
8
9
10
11
12
13
14
15
16
17
18
19
20
21
22
23
24
25
26
27
28
{ ... "architect": { "build": { "options": { ... "assets": [ { "glob" : "**/*" , "input" : "node_modules/ace-builds/src-min" , "output" : "./assets/ace-builds/" } ], "styles": [ "node_modules/bootstrap/dist/css/bootstrap.min.css", "node_modules/font-awesome/css/font-awesome.min.css", "node_modules/ngx-markdown-editor/assets/highlight.js/agate.min.css" ], "scripts": [ "node_modules/ngx-markdown-editor/assets/highlight.js/highlight.min.js", "node_modules/ngx-markdown-editor/assets/marked.min.js" ] ... } } } ... }
index.html 파일에서 아래 내용을 추가합니다.
1 2 3 4 5 6 <html > <head > <script src ="/assets/ace-builds/ace.js" > </script > </head > <body > </body > </html >
LMarkdownEditorModule을 import 합니다.
1 2 3 4 5 6 7 8 9 10 11 12 13 14 15 16 import { NgModule } from '@angular/core' ;import { BrowserModule } from '@angular/platform-browser' ;import { FormsModule } from '@angular/forms' ;import { AppRoutingModule } from 'app/app-routing.module' ;import { LMarkdownEditorModule } from 'ngx-markdown-editor' ;@NgModule ({ declarations: [AppComponent], imports: [BrowserModule, FormsModule, AppRoutingModule, LMarkdownEditorModule], providers: [], bootstrap: [AppComponent], }) export class AppModule {}
md-editor 태그를 사용하여 작성합니다.
1 2 3 4 5 6 7 8 9 10 11 12 13 14 15 16 17 18 <div class ="row" > <div class ="col-12" > <div class ="form-group" > <md-editor id ="description" name ="description" [upload ]="doUpload" [(ngModel )]="markdownText" [mode ]="mode" [options ]="options" required height ="400px" > </md-editor > </div > </div > </div >
Option, Text, Mode, Upload 설정을 합니다.
1 2 3 4 5 6 7 8 9 10 11 12 13 14 15 16 17 18 19 20 21 22 23 24 25 26 27 28 29 30 31 32 33 34 35 36 37 38 39 40 41 42 43 44 45 46 47 48 49 50 51 52 53 54 55 56 57 58 import { Component, OnInit } from '@angular/core' ;import { UploadResult, MdEditorOption } from 'ngx-markdown-editor' ;@Component ({ selector: 'app-root' , templateUrl: './app.component.html' , styleUrls: ['./app.component.scss' ], }) export class AppComponent implements OnInit { public markdownText: string ; public mode: string = 'editor' ; public options: MdEditorOption; constructor ( doUpload(files: Array <File>): Promise <Array <UploadResult>> { return new Promise ((resolve, reject ) => { setTimeout(() => let result: Array <UploadResult> = []; for (let file of files) { result.push({ name: file.name, url: `https://avatars3.githubusercontent.com/${file.name} ` , isImg: file.type.indexOf('image' ) !== -1 , }); } resolve(result); }, 3000 ); }); } ngOnInit(): void { this .options = { showPreviewPanel: false , enablePreviewContentClick: false , resizable: true , customRender: { image: function (href: string , title: string , text: string ) let out = `<img style="max-width: 100%; border: 20px solid red;" src="${href} " alt="${text} "` ; if (title) { out += ` title="${title} "` ; } out += (<any >this .options).xhtml ? '/>' : '>' ; return out; }, }, }; } }
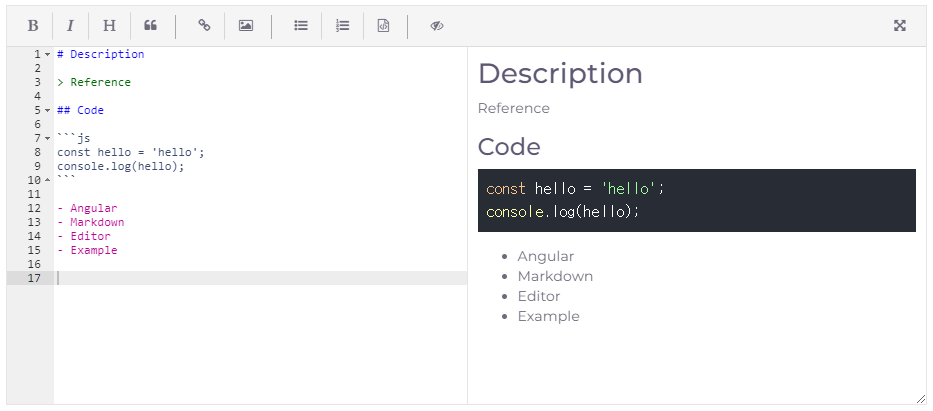
Markdown Editor 구현된 이미지입니다.
아래 참고 사이트에서 자세하게 설명이 되어있습니다. 참고하여 구현하시면 됩니다.